
come visit me at booth #148 at the fort mason center this weekend!
My new favorite accessory on the market is Hats! A simple yet fashionable accessory that can vamp anyone’s style. bricola(e)able, a seller on etsy, offers a small collection of hats made from recycled, vintage, or sustainable materials. What first caught my eye when I saw one of their hats was the inspiration behind it. These hats remind me of an olden day equestrian hat, paperboy hat, and 1950s kids baseball cap.
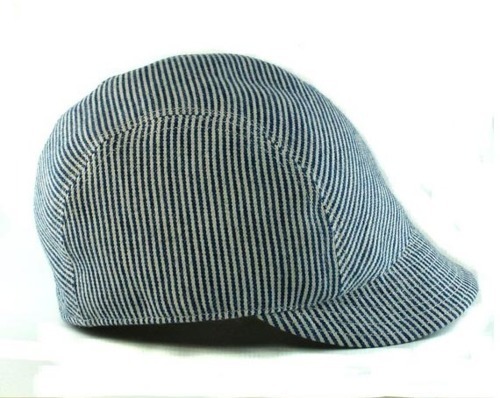

Spring may be coming early this year, according to a certain oracular groundhog, but that doesn’t mean your punim should suffer through brain-freezing temps in the interim. Put a lid on it with one of Bricolagable’s jaunty coed caps, made from 100 percent reclaimed wool and lined with cotton to stave away the itchies. Only two or three of each design available, so they’re super-limited-edition. Plus, 10 percent of all proceeds will go to Muttville, which rescues, fosters, and advocates for senior pooches.
 come visit bricolag(e)able and venn apparel at renegade's holiday sale next weekend!
 thanks to everyone who came out to root division's holiday sale last night! it was a blast and a nice way to gear up for renegade next weekend and allowed me to make another donation to www.muttville.org which is going to be doubled thanks to some generous sponsorship- horray!
 renegade was amazing and exhausting. 2 days surrounded by creative people and many, many cute dogs! hopefully we will come back at christmas for the holiday fair. now i'm in post renegade clean-up mode and slowly posting my remaining inventory on etsy.


for optimal color and light fastness most natural dyes need something to hold onto which is where the mordant comes in -there are a bunch to choose from but only a few that i consider safe tannins (those derived from plants such as oak, sumac and black tea or tannic acid) and alum which is a kitchen grade pickling spice that can be used to water acid loving plants once you're finished with it- cream of tarter is a good companion to alum but not for madder
make sure your wool is clean and thoroughly wet (soak in warm water with a touch of shampoo for at least 30min)
add wet wool to pot - make sure the fiber and the water in the pot are around the same temp. slowly heat pot to between 180-195 degrees holding temp. for at least 30 min, 1 hour is better- DO NOT BOIL YOUR WOOL
1) soak your dried dye stuffs
(unnecessary if you are using fresh plants/berries etc.)
i usually pour hot or boiling water over them in a jar then seal it up and forget about it for a couple of weeks/months;) but soaking overnight will suffice

(above: brazilwood, lac, madder)


at this point i usually put the strained dye parts into an over sized, makeshift tea bag of sort- the one below i actually made to be a sand bag but never got around to filling it- its a medium weight cotton canvas and works fine but if i were making it specifically for dying i would use a lighter weight fabric with a slightly looser weave and would have washed it first to remove any sizings/finishes since i really had to fight with this one to get it to strain.
 bagging up your dye parts saves straining them each time you change the water and works great so long as a) the top is tied, b) the dye parts have enough room to move around in the bag
repeat steeping with clear water until no more color is left or until you have as much as you need (for the latter you can lay your dye bits on a screen to dry, put them away and re use them in the future for more muted dyes)
5) bath time for the woolies
time to dye your wool! in a pot big enough to let your woolies swim freely fill with enough water to cover your fiber and add some dye liquor- how much depends on you
 (i am cheating with my visual aids -this is not a madder dye bath but rather a very overstuffed mixed dye bath i was trying to exhaust..apologies;)
darker shades can be attained, obviously, by adding more dye but dye guru, michele wipplinger of earth hues, suggests using multiple immersions to give the fiber a darker, more lustrous color- to do this simply remove the fiber from the dye bath after a half hour or so, add more dye liquor to the dye pot and reintroduce fiber (this can be done as many times as you like)
remember when eyeballing the color that wool dries 1-2 shades lighter than it appears in the bath
the temperature of the madder dye bath should be raised slowly once the wool has been added and maintained between 140-165 for at least an hour and allowed to cool over night
fiber can then be rinsed or can be air cured for a few days before rinsing
-painting's another story and another post-
 oddly enough, my safflower dye plants preferred it under my work table- they kicked it within a week of the move:( R.I.P little seedlings)

true, i did manage to grow potatoes in my living room, but i'm not convinced they were edible
 (though that didn't stop me from keeping them in a bowl for 3 months as a trophy;)
francis can now play in the back yard without broken glass as an obstacle course and she has some drought resistant grass of her very own to pee on and kill.

after killing myself trying to level the ground enough to make the remaining slabs lay flat and patio-style i realized it was never going to happen without something, or someone, more hardcore than me, my shovel and my two stomping feet (which are surprisingly good levelers actually) - so started over and went for the "stagger" effect, hopefully my baby's tears will fill in nicely and obscure the crooked and slightly sloping end result.

First, a bobble headed baby literally erupts from the soil,
gets shy for a moment after it's very pushy entrance and tentatively checks out the situation..if all's well...


less than a month after planting the seeds we've already had our first garden-picked salad and

it was crunchy and delicious.
 a drumstick case for my sweetheart,
 dyed some recycled merino wool and cashmere with quebacho and logwood plant dyes,
 spun up the roving i dyed this summer and spun up all 'loosey goosey',
  made some pin cushions, and of course, pillows.


